Let’s create DIY Smart AC control with Obniz. This project allows you to measure room temperature and control your AC from anywhere with your smartphone. This project is pretty simple and only takes very less effort to build.
Things used in this DIY Smart AC control project:
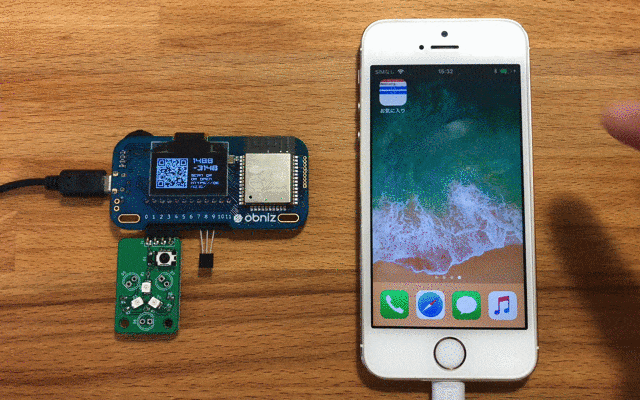
Obniz
IR module
LM32DZ
Smartphone
What is Obniz?
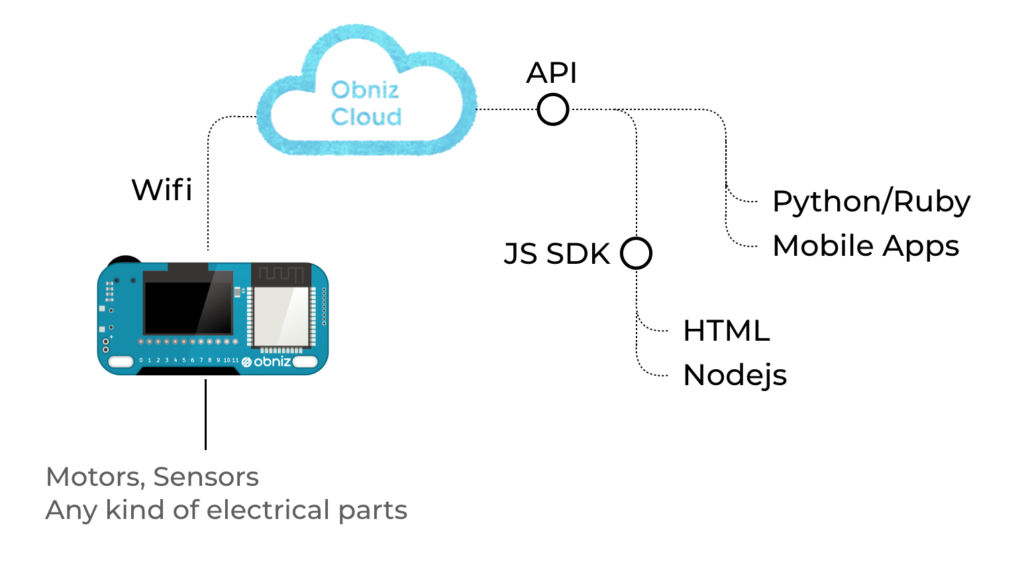
Obniz is a cloud based IoT development board and its pretty new to the market. You can program it using a web browser and command to Obniz through the internet via Obniz cloud. By connecting the Obniz to the cloud via Wi-Fi, users can remotely control devices that are connected to Obniz board by physical means.
It 12 I/O and WiFi-BLE module in built on the board. It can be controlled through API’s – REST or WebSocket API – on Obniz cloud. Apart from simple IO ON / OFF Obniz provides UART, I2C, BLE etc and these features can be used by remotely controlling Obniz via internet. In terms of hardware, every IO can drive up to 1A with over correct protection. This therefore can help to handle high current demanding devices such as motors and can be connected directly. Embedded parts such as switch, OLED display, and BLE are ready for use on program.
More information on Obniz is available on its website.
1. Connect Obniz to any Wi-Fi hotspot.
2. Connect your desired devices to Obniz.
3. Scan QR code on the Obniz board and start programming. The highlighting part is that you do not need to install any software.
Step 2:
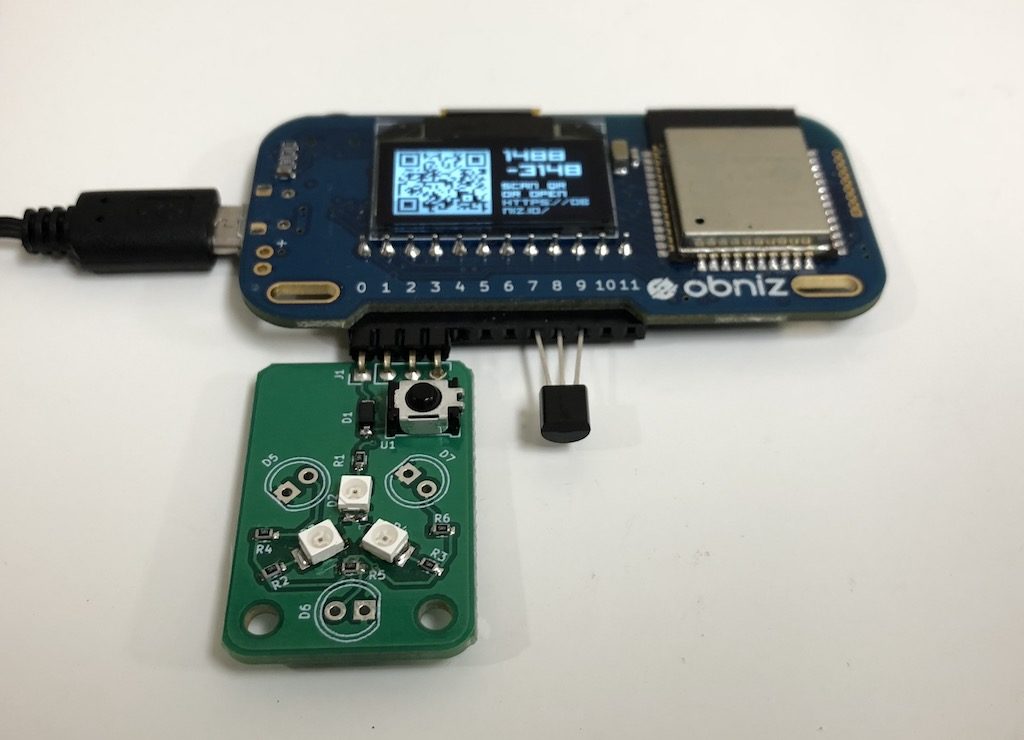
Connect IR module and LM32DZ to Obniz as below and place it in the room where you want to measure the temperature of your Air Conditioner.
Step 3:
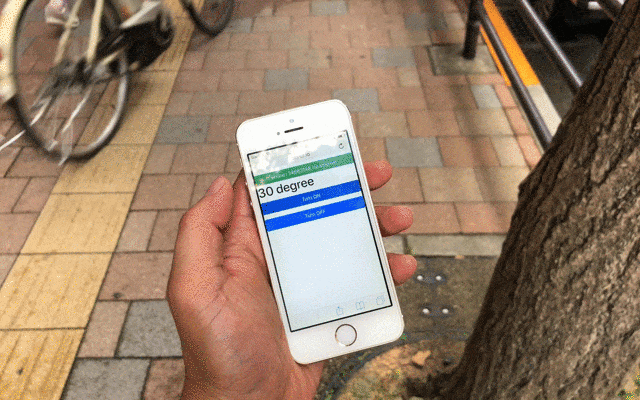
Write the program written in the program section. You need to change Obniz ID in the program to yours. By clicking “save & open,” you can see the room temperature.
Step 4:
Each Air conditioner has IR remote which sends encoded IR signal to the AC unit and controls them. Since we don’t how encoding was done in a particular AC unit, we need to record the IR signal input from the AC remote first. Record your AC’s remote signal for ON/OFF. The example code contains comment outed code for IR receiver. Remove the comment out and record your air conditioner’s ON/OFF signal since it will be unique for each remote. Your signal will be in the log. Put the recorded data array into your code and Use it!
Just open the HTML with your smartphone. You can control your air conditioner from everywhere in the world! Your DIY Smart AC control is now ready.
CODE:
<!-- HTML Example -->
<html>
<head>
  <meta name="viewport" content="width=device-width, initial-scale=1">
  <link rel="stylesheet" href="https://stackpath.bootstrapcdn.com/bootstrap/4.1.1/css/bootstrap.min.css">
  <script src="https://obniz.io/js/jquery-3.2.1.min.js"></script>
  <script src="https://unpkg.com/obniz@1.6.1/obniz.js"></script>

</head>
<body>

<div id="obniz-debug"></div>

<h1 id="temp">Measuring...</h1>

<p>
  <button id="on" class="btn btn-primary btn-block">Turn ON</button>
</p>
<p>
  <button id="off" class="btn btn-primary btn-block">Turn OFF</button>
</p>

<script>

var obniz = new Obniz("OBNIZ_ID_HERE");

obniz.onconnect = async function () {

  //var sensor = obniz.wired('IRSensor', {vcc:0, gnd:3, output: 2});
  //sensor.start(function (arr) {
  //  console.log('detected!!')
  //  console.log(JSON.stringify(arr));
  //})

  // Javascript Example
  var tempsens = obniz.wired("LM35DZ",   { gnd:7 , output:8, vcc:9});
  tempsens.onchange = function(temp){
    $("#temp").text('' + parseInt(temp)+ ' degree')
    obniz.display.clear();
    obniz.display.font('Avenir', 60)
    obniz.display.print('' + parseInt(temp) + '℃')
  };

  var infraredLed = obniz.wired('InfraredLED', {anode: 1, cathode: 3});

  $("#on").click(function(){
    // your value for ON here.
    infraredLed.send([])
  })

  $("#off").click(function(){
   // your value for OFF here
    infraredLed.send([])
  })
}


</script>
</body>
</html>
Hope this article was helpful to you guys. Leave your thoughts/ feedback in the comment section below. Happy DIY.