In this tutorial am going to demonstrate how to use IR as a medium for remote control and how to integrate in variety of your Arduino projects. For the purpose of demonstration I have used DC motor and RGB LED module WS2812 as the things to control using IR remote.
MATERIALS REQUIRED:
MOSFET IRLB8743
Resistor 1K ohms
DC motor – 5v
Infrared remote or transmitter
Infrared receiver module
External supply voltage – 5v
WS2812B LED’s
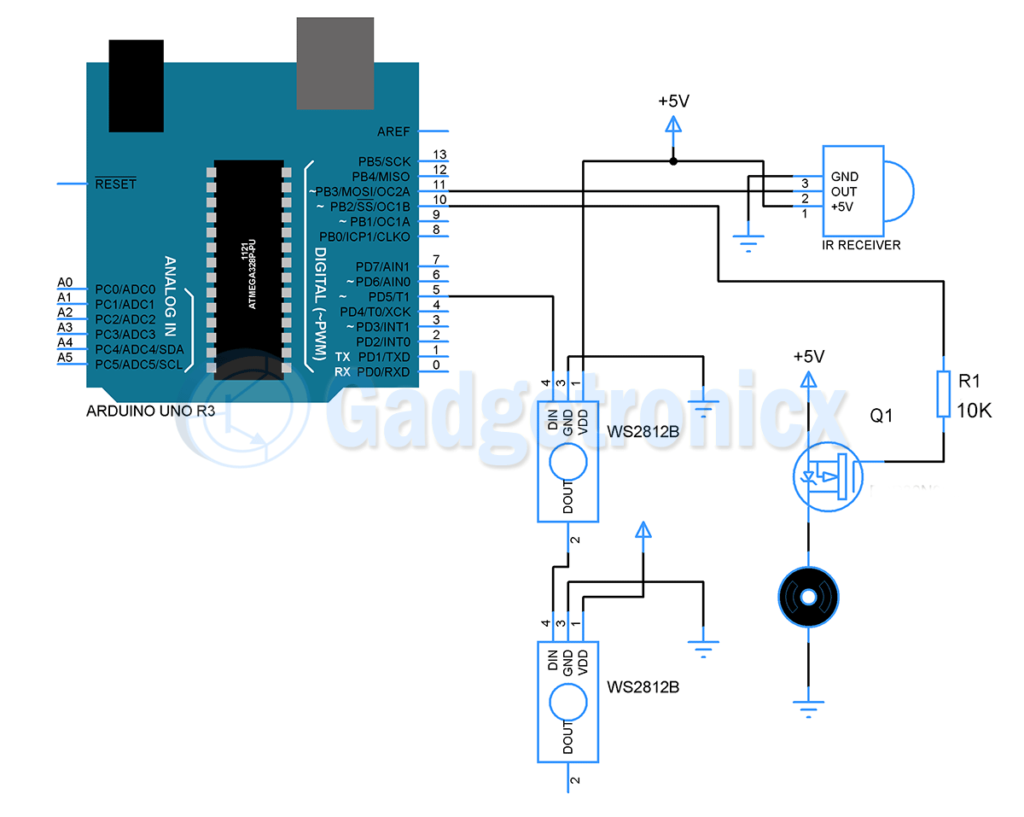
SCHEMATIC DIAGRAM:
CONTROLLING A DC MOTOR USING MOSFET:
We are going to use MOSFET as a switch to activate the DC motor. This is because Arduino cannot source the current required to drive a motor from its pins directly so we need to use any type of switch which in my case is the MOSFET. As we already know if we apply the threshold voltage to the gate of the MOSFET the drain and the source current will run through them. We are also adding a limiting resistor (10k in my case).Our DC Motor is going to be connected to the drain pin of our MOSFET. After our connection is complete we connect in Pin 10 of our Arduino to the gate of the MOSFET. The connection as you can see is fairly easy.
CONTROLLING WS2812B WITH ARDUINO:
The WS2812B RGB LED’s have 3 Pins (GND,DATA,5V) so we connect data in pin 5 of our Arduino. And for the GND we connect it our Arduino and external power supply GND too in order to have common ground in our circuit. Next we connect our 5 Volts to our power supply.We are using an external power supply because as we know Arduino cannot provide the circuit more than 40ma the max rating is 50ma so we will run into the risk of damaging the microcontroller. In my case i am using 8 WS2812B leds which they draw 20ma per color,which means 20ma*24=480ma so let’s say at full PWM we are using 0.5 Ampere of current.
IR TRANSMISSION AND DECODING:
First of all i am using 1838T Infrared Receiver and general Infrared Remote control for my project I first choose the numbers from my controller that i want to use and i checked their hexadecimal number using the IRremote.h library example sketch in order to find the correct hexadecimal numbers (which is in my case→0:FF6897, 1:FF30CF, 2:FF18E7, 3:FF7A85). To determine the hex values transmitted by your remote you need to perform the following steps.
Upload the IRrec test sketch into your Arduino from the Examples section.
You must be using IR receiver connected to the Arduino.
Now open the serial remote in Arduino IDE
When you press corresponding buttons in your IR remote, you can actually watch the live HEX values as data in the serial monitor.
Using this method you can also use any type of IR remote even your TV remote or remote for any other appliances.Then i connected my receiver as shown in the schematic and i declared those hexadecimal values as unsigned long int in my code.
#include <IRremote.h>
#include <Adafruit_NeoPixel.h>
#ifdef __AVR__
  #include <avr/power.h>
#endif

// Which pin on the Arduino is connected to the NeoPixels?
// On a Trinket or Gemma we suggest changing this to 1
#define PIN            5

// How many NeoPixels are attached to the Arduino?
#define NUMPIXELS      8

// When we setup the NeoPixel library, we tell it how many pixels, and which pin to use to send signals.
// Note that for older NeoPixel strips you might need to change the third parameter--see the strandtest
// example for more information on possible values.
Adafruit_NeoPixel pixels = Adafruit_NeoPixel(NUMPIXELS, PIN, NEO_GRB + NEO_KHZ800);

int delayval = 100; // delay for half a second
//Pin 11 for IR Receiver
int RECV_PIN = 11;
IRrecv irrecv(RECV_PIN);
decode_results results;
//Pin 10 for Dc Motor
int DcMotor = 10;


//My IR transmitter hexadecimal values that i choose.
unsigned long int InputIr;
unsigned long int ZeroMove = 0xFF6897;
unsigned long int FirstMove = 0xFF30CF;
unsigned long int SecondMove = 0xFF18E7;
unsigned long int ThirdMove = 0xFF7A85;

void setup() {
  // This is for Trinket 5V 16MHz, you can remove these three lines if you are not using a Trinket
#if defined (__AVR_ATtiny85__)
  if (F_CPU == 16000000) clock_prescale_set(clock_div_1);
#endif
  // End of trinket special code
  pixels.begin(); // This initializes the NeoPixel library.
  Serial.begin(9600);
  irrecv.enableIRIn(); // Start the receiver
  pinMode(DcMotor,OUTPUT);
}

void loop() {
if (irrecv.decode(&results)) {
    Serial.println(results.value, HEX);
    InputIr = (results.value);
    delay(100);
    irrecv.resume(); // Receive the next value
  }

  if (InputIr == ZeroMove){
    Serial.println("CHECK0");
      for(int i=0;i<NUMPIXELS;i++){

        // pixels.Color takes RGB values, from 0,0,0 up to 255,255,255
        pixels.setPixelColor(i, pixels.Color(150,0,0)); // color of ws2812b that you like RGB


        pixels.show(); // This sends the updated pixel color to the hardware.

        delay(delayval); // Delay for a period of time (in milliseconds).
        analogWrite(DcMotor,70  );
        delay(100);

    }
  }
  if (InputIr == FirstMove){
    Serial.println("CHECK1");
      for(int i=0;i<NUMPIXELS;i++){

         pixels.setPixelColor(i, pixels.Color(126,60,0));

         pixels.show();

         delay(delayval);
          analogWrite(DcMotor,100);
          delay(100);
    }
  }


  if (InputIr == SecondMove){
     Serial.println("CHECK2");
       for(int i=0;i<NUMPIXELS;i++){

          pixels.setPixelColor(i, pixels.Color(8,40,126));

          pixels.show();

          delay(delayval);
           analogWrite(DcMotor,150);
           delay(100);
    }
  }

  if (InputIr == ThirdMove){
     Serial.println("CHECK3");
       for(int i=0;i<NUMPIXELS;i++){

          pixels.setPixelColor(i, pixels.Color(0,155,0));

          pixels.show();

          delay(delayval);
           analogWrite(DcMotor,250);
           delay(100);
    }
  }


   if  ((InputIr != ZeroMove)&&(InputIr != FirstMove)&&(InputIr != SecondMove)&&(InputIr != ThirdMove)); {
      Serial.println("STOP");
       for(int i=0;i<NUMPIXELS;i++){

        pixels.setPixelColor(i, pixels.Color(0,0,0));

        pixels.show();

        delay(100);
        analogWrite(DcMotor,0);
        delay(100);
  }
 }

}
You can figure out the value of each and every button in your IR remote. This will give an many codes which in turn means many possible devices to interface and control with Arduino Uno.