
Float sensor is used in projects where you need to detect the level of water in a tank or any reservoir. In this tutorial we will see what is a Float sensor, How it works and how to interface this sensor with Arduino with wiring connections and the code.
FLOAT SENSOR SWITCH:
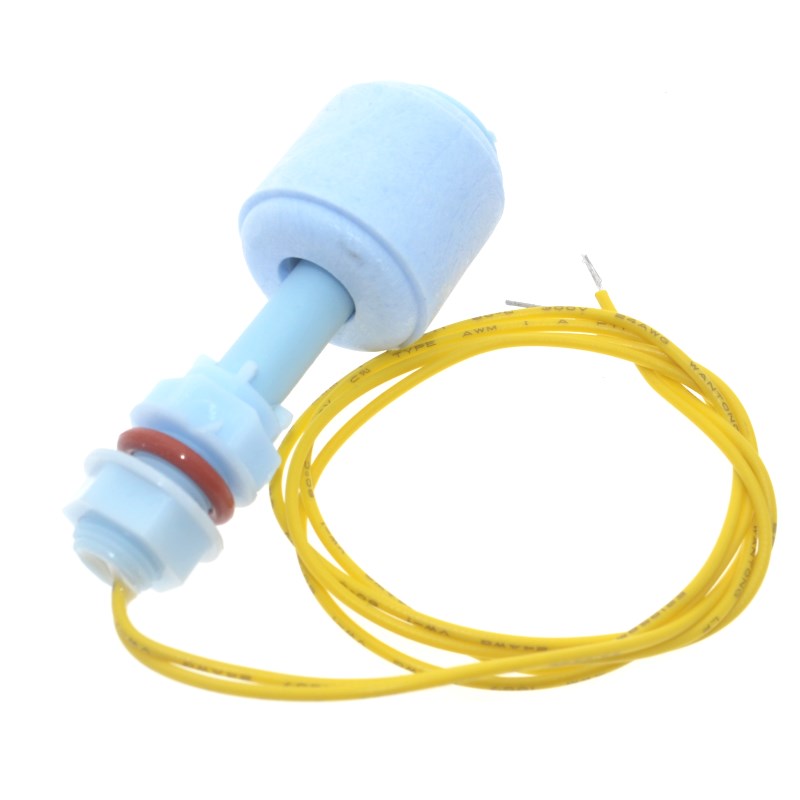
The float sensor consists of an electromagnetic switch. It operates just like any other switch. Here a Magnetic reed switch is placed in the stem of the sensor. A magnet will be in the bulb structure of float sensor. When water fills up in a reservoir the bulb structure which has the magnet starts moving up once water reaches a certain level. It moves up close to stem near the reed switch. Due to the force of attraction from this magnet reed switch closes indicating water level is high.
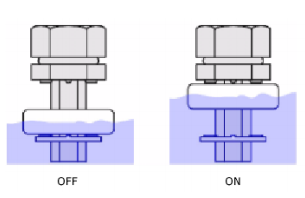 When the water level goes down the bulb moves down and reed switch contact breaks and by this way the system detects that water level has gone down and acts accordingly.
- The maximum switch current of the float is 0.5A and the switch voltage of 100V DC.
- The temperature rating is about 10-85 degrees centigrade.
- The power rating of this sensor is about 10W.
- The entire body of this sensor is made up of plastic.
INTERFACING THE MAGNETIC FLOAT SENSOR SWITCH WITH ARDUINO:
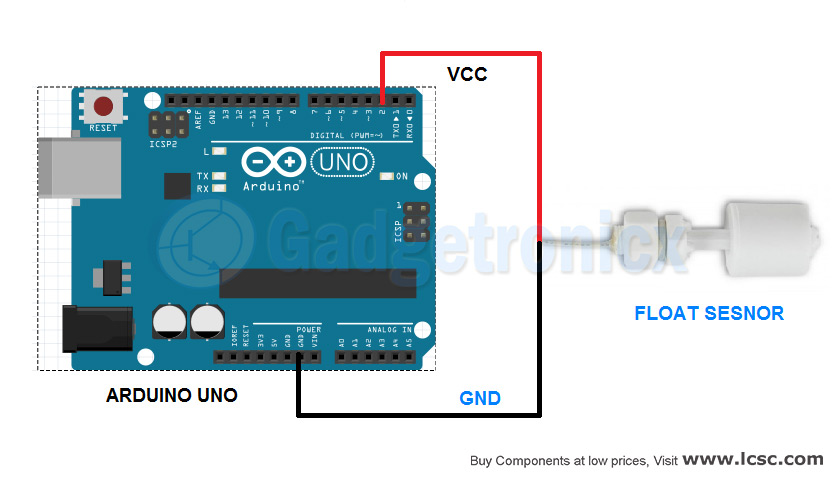
The float sensor consists of two terminals, VCC and GND. The VCC terminal of float sensor goes to digital pin 2 on the Arduino board and GND terminal to ground of Arduino board. It acts as a switch here and pin 2 of Arduino reads this switch state for either being high or low. Here we have used inbuilt LED of Arduino board as an indication for float and message of the switch state will be displayed in Serial monitor.
CODE:
int FloatSensor=2;
int led=13;
int buttonState = 1; //reads pushbutton status

void setup()
{
Serial.begin(9600);
pinMode(FloatSensor, INPUT_PULLUP); //Arduino Internal Resistor 10K
pinMode (led, OUTPUT);
}
void loop()
{
buttonState = digitalRead(FloatSensor);
  if (buttonState == LOW)
  {
    digitalWrite(led, HIGH);
    Serial.println( "WATER LEVEL - HIGH");
  }
  else
  {
    digitalWrite(led, HIGH);
    Serial.println( "WATER LEVEL - LOW" );
  }
delay(1000);
}
CODE EXPLANATION:
In this code, two components are available to indicate the Water level. They are LED and Serial monitor. We use three variables in this program. The following steps explain the program completely.
- Initially, the sensor is connected to Pin 2 and LED in pin 13 that is the built-in LED on the Arduino board.
- Initialize serial communication.
- Now the digital values are read from the sensor and stored in the variable.
- When variable “buttonState” is in high state, it denotes that the water level is low and yet to reach the destined limit. Now Arduino prints the message “WATER LEVEL – LOW” and turns LED off.
- When water level reaches sensor level “buttonState” sensor output goes low and Arduino prints the message “WATER LEVEL – HIGH” message in serial monitor and simultaneously LED glows.
- The program repeats reading the button state with a delay of 1 second.
APPLICATIONS OF FLOAT SENSOR:
- Pump/Valve control
- Fuel and Water Tanks.
I hope this tutorial explained you enough about Float sensor and how it interfaces with Arduino. Do check out our other tutorials related to Arduino. Do leave your comments/ feedback and queries related to this tutorial below, we will be happy to answer your questions.


Hi, do I have this backwards?
The pullup on pin 2 will cause the read to be HIGH when the water level is low.
When the water level goes up the magnet will close the reed switch and pin 2 will go LOW.
Shouldn’t it be:
if (buttonState == LOW)
{
digitalWrite(led, HIGH);
Serial.println( “WATER LEVEL – HIGH”);
Or do I have something backwards?
Regards,
Al
Al,
That’s right the logic should be vice versa. Thanks for pointing this out. Made the edit now.
Good Article.Is this sensor very expensive
Not really. Cost about $2 to $3usd.
I would like to ask that what about the height of the tank? Is there any restriction about the height?
Height of the tank is not a factor for this sensor as it relies on establishing contact using the water level.