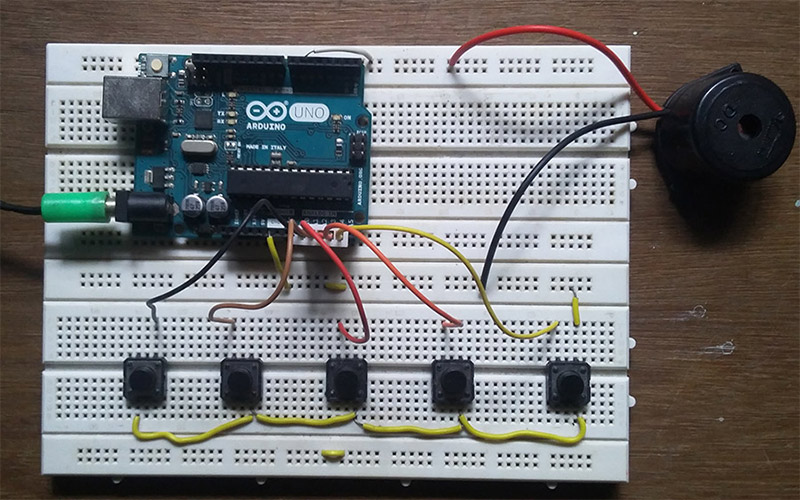
Here is yet another application you can put your Arduino to use. This will be an interesting DIY to make even though you are not very much into music. Though you cannot expect music out of this but still it will be a fun project worth giving a shot, trust me. This piano using Arduino was made out of switch buttons (used as keys), buzzer as sounder generate tones with different frequency.
SCHEMATIC DESIGN OF PIANO USING ARDUINO:
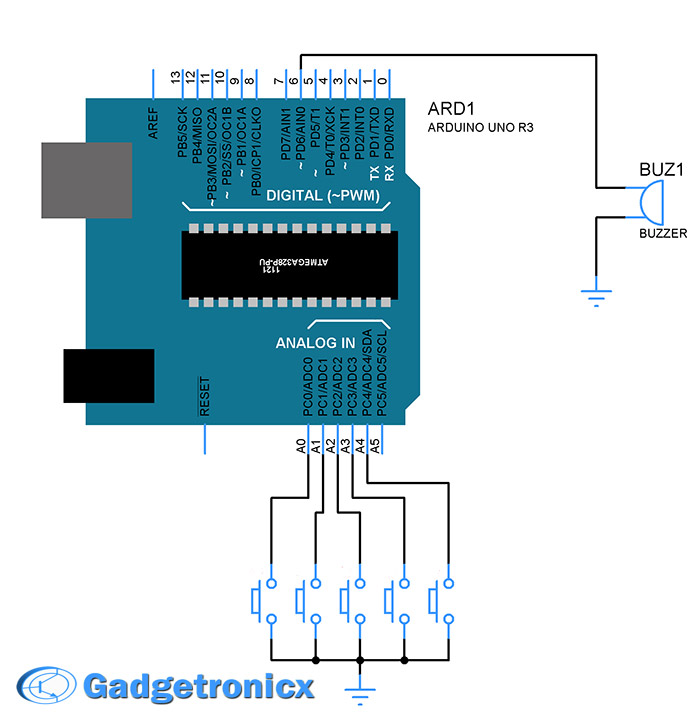
The schematic design for this project is pretty straightforward. Five push buttons B1 to B5 were connected to pins A0 to A4 of Arduino. These are assigned as input pins for Arduino. The push buttons were connected in such a way when pressed it will give the Ground input to the pins A0 to A5. A DC buzzer was connected to pin 6 of Arduino. This will act as a sounding element to our piano using Arduino.
MUSICAL NOTES:
Though i don’t have much idea about music i managed to find the frequency of basic notes in a piano here. Here is another list of tone frequencies that was available in official Arduino website. You can use any of those frequency values in your code to produce that specific note.
TONE() SUBROUTINE:
I have used an in built subroutine tone() in my code. The syntax of this subroutine takes the form
Duration represents the length of each note and each note have their own note like half note quarter note and so. These duration should be used in this subroutine. For example if your selected note was a quarter note then the duration will be in 1000/4 = 250 ms. This value obtained was in Milli seconds. You have to apply 1000/8 and 1000/2 for eighth and half note respectively.
CODE:
#define NOTE_C4  262          //Frequency for each notes
#define NOTE_G3  196
#define NOTE_B3  247
#define NOTE_C4  262
#define NOTE_A3  220
short int buzzer= 6;
int tone_freq[5]={NOTE_C4, NOTE_B3, NOTE_G3, NOTE_A3, NOTE_C4};
int duration[5]={250,250,125,250,250};    //Duration in terms of ms

void setup() {
 pinMode(6,OUTPUT);
 pinMode(A0, INPUT_PULLUP);
 pinMode(A1, INPUT_PULLUP);
 pinMode(A2, INPUT_PULLUP);
 pinMode(A3, INPUT_PULLUP);
 pinMode(A4, INPUT_PULLUP);
}

void key_tones(int a)
{
  tone(6,tone_freq[a],duration[a]);       //Calling out the specific note for each input
}

void loop() {
  if(digitalRead(A0)==LOW)               //Detecting key press
  {
  while(digitalRead(A0)==LOW);
  key_tones(0);
  }
  else if(digitalRead(A1)==LOW)
  {
  while(digitalRead(A1)==LOW);
  key_tones(1);
  }
  else if(digitalRead(A2)==LOW)
  {
  while(digitalRead(A2)==LOW);
  key_tones(2);
  }
  else if(digitalRead(A3)==LOW)
  {
  while(digitalRead(A3)==LOW)
  key_tones(3);
  }
  else if(digitalRead(A4)==LOW)
  {
  while(digitalRead(A4)==LOW);
  key_tones(4);
  }
}
NOTE:
As already mentioned you won’t get a pleasant music out of it but using speaker as sounding element will improve the output tone produced.
You can substitute push buttons with other switches you desire.