With everything getting automated these days I think it’s only fair to give good old school bell a touch of automation. So I thought to design and develop Automatic school bell system using Arduino development board. This system activates the School bell at predefined time each day. Add this project comes with a manual switch to activate the bell. This will give the liberty to the user to activate it manually when required.
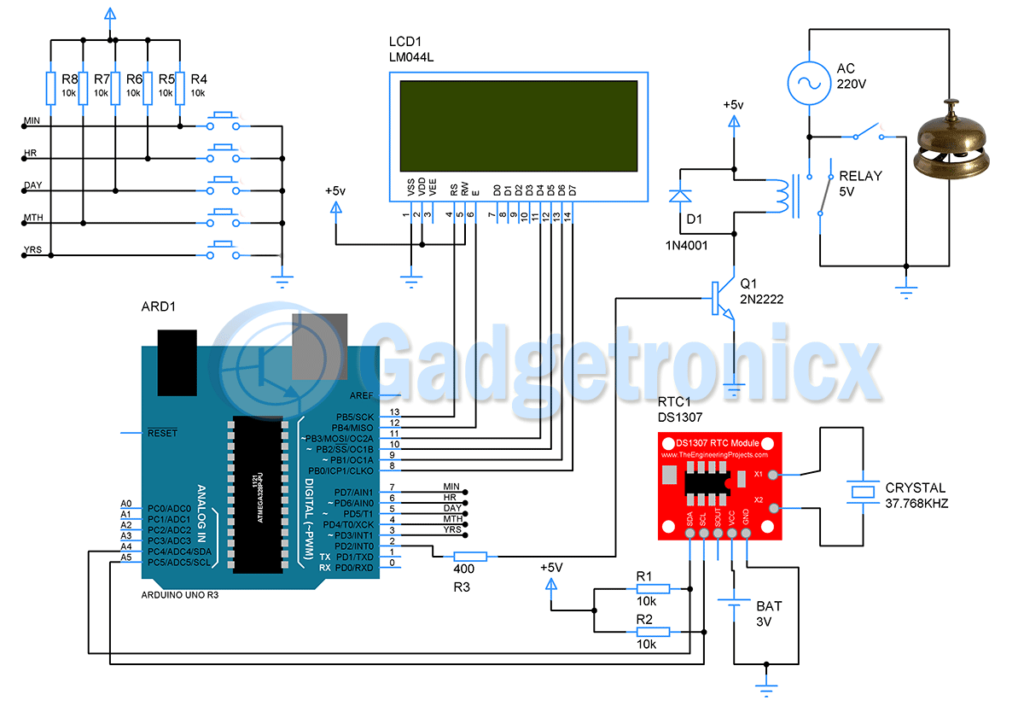
SCHEMATIC DESIGN OF AUTOMATIC SCHOOL BELL SYSTEM:
DS1307 RTC MODULE:
DS1307 is an Real time clock chip that is used in many Embedded applications for adding real time to the system. Timing generated using Microcontroller delays are not precise as real time so when comes to time sensitive applications like Alarms, Timers usage of RTC chips is very much necessary. This RTC chip will communicate with Arduino using I2C communication protocol to provide real time input. Arduino can use this real time input to perform the desired operation, in our case it’s ringing of School bell.
WORKING OF AUTOMATIC BELL PROJECT:
The working of this Automatic School bell system starts with Real time clock module DS1307. This module feeds Arduino with real time and keeps track of it. Through the process of polling Arduino will frequently get the time and date values from this chip. Also user has been given five button inputs which they can use to set the Hours, minutes, Date, month and year in the RTC chip. Continuous toggle of these buttons will vary the corresponding values and register them in RTC chip. The automatic bell timer is activated by means of a Relay which is controlled via a transistor switch. The transistor switch is very much necessary since Arduino cannot source enough current to operate the relay directly. Adding a flywheel diode D1 will act as a protection to the rest of circuit when the relay is turned OFF.
CODE:
You need to install two Arduino libraries for this to work – DS1307 library and Time library , thanks to Paul Stoffregen I have commented the code almost every line for better understanding and the coding part is pretty simple as well.
#include <LiquidCrystal.h>
#include <TimeLib.h>
#include <DS1307RTC.h>
#include <Wire.h>
LiquidCrystal lcd(13,12,11,10,9,8); /* lcd pinouts initialising */
int datetime[7]; /* stores the Time and date values */ /* setting up the input pins */
//int Hour, Min, Sec,Day,Month, Year;
tmElements_t tm;

void setup()
{
  for(int i=3;i<8;i++)
  {
    pinMode(i,INPUT);
  }
  pinMode(2,OUTPUT); /* pin for the bell */
  lcd.begin(20,2); /* powering up the lcd */
  tm.Hour=9;
  tm.Minute=0;
  tm.Second=0;
  tm.Day = 1;
  tm.Month=1;
  tm.Year = 20;

  //RTC.set(19,3,19,0,9,59,50);//d,m,y,sem,h,m,s - sets the time and date
} // this will run forever till you die or till power goes off


void loop()
{

  //DS1307.getDate(datetime); /* get date */
  setSyncProvider(RTC.get);
  lcd.setCursor(0,1); /* move the cursor down */
  lcd.print("Time: ");
  Print(tm.Hour); /* print hour on the lcd */
  lcd.print(":");
  Print(tm.Minute); /* print minute */
  lcd.print(":");
  Print(tm.Second); /* print seconds */
  lcd.setCursor(0,0); /* move cursor back ontop */
  lcd.print("Date: ");
  Print(tm.Day); /* day */
  lcd.print("/");
  Print(tm.Month); /* month */
  lcd.print("/");
  Print(tm.Year); /* add 20 to it making it 2019 */
  Print(datetime[0]); /* Print Year */ /* validating minutes, seconds and months for LCD printing and to avoid errors */
  if(digitalRead(7))
  {
    tm.Minute++;
    if(tm.Minute>59)
    tm.Minute=0; /* if minute is 59 */
    RTC.set(tm.Minute);
    while(digitalRead(7));
    }
   if(digitalRead(6))
   {
    tm.Hour++;
    if(tm.Hour>23)
    tm.Hour=0; /* if hour has reached 24, making it 24 hours max */
    RTC.set(tm.Hour);
    while(digitalRead(6));
    }
    if(digitalRead(5))
    {
      tm.Day++;
      if(tm.Day>28&&tm.Month==2)
      tm.Day=1; /* Setting the days in a month */
      else if(tm.Day>30&&(tm.Month==4||tm.Month==6||tm.Month==9||tm.Month==11))
      tm.Day=1;
      else if(tm.Day>31)
      tm.Day=1;
      RTC.set(tm.Day); /* update the date and time */
      while(digitalRead(5)); }
      if(digitalRead(4))
      {
        tm.Month++;
        if(tm.Month>12)
        tm.Month=1; /* if 12 months reached */
        RTC.set(tm.Month); /* update the date and time */
      while(digitalRead(4));
      }
      if(digitalRead(3))
      {
        tm.Year++;
        if(tm.Year>99)
        tm.Year=0; /* Years */
        RTC.set(tm.Year); /* update the date and time */
        while(digitalRead(3)); } /* give it some time */
        delay(5); /* checking the time to sound the bell */
      if(tm.Hour==10 && tm.Second==00)
      {
        digitalWrite(2, HIGH); /* sound the bell */
        delay(10000); /* let it ring for 10 seconds */
        digitalWrite(2, LOW); /* mute the bell */
      }
      if(tm.Hour==11 && tm.Second==00)
      {
          digitalWrite(2, HIGH); /* sound the bell */
          delay(10000); /* let it ring for 10 seconds */
          digitalWrite(2, LOW); /* mute the bell */
       }
      if(tm.Hour==12 && tm.Second==00)
        {
            digitalWrite(2, HIGH); /* sound the bell */
            delay(10000); /* let it ring for 10 seconds */
            digitalWrite(2, LOW); /* mute the bell */
        } /*Repeat the above four lines of code with altered Hours and Minute values to make the bell ring for more time periods */
} /* convert array to a value that can be displayed on the LCD */
void Print(int number)
  {
    lcd.print(number/10);
    lcd.print(number%10);
   }
NOTE:
You need too look for the current rating of your electric Bell and choose the Relay and switching transistor accordingly.
Keep this unit hidden and limited to be used by authorized personal.
Repeat the four lines of code from 84 to 89 and use it with altered hours and minutes values for more time period.
Hi can you help me please to built the automatic Bell for our school? In our school we have three period before breakfast, and after breakfast, we have four period, then closing our, we are ranging the bell manually in a first,second,third period short ranging in each period, and we are ringing long ranging in a break time and the closing our, please can some one help me


Hi can you help me please to built the automatic Bell for our school? In our school we have three period before breakfast, and after breakfast, we have four period, then closing our, we are ranging the bell manually in a first,second,third period short ranging in each period, and we are ringing long ranging in a break time and the closing our, please can some one help me
Sir input buttons is not working and led not show date and timing