Arduone Uno is a development board built out of 8051 series Microcontroller. It’s pretty simple and straightforward to use. In this article I want to give a brief about this development platform and how to program them as per your desire.
8051 Development board:
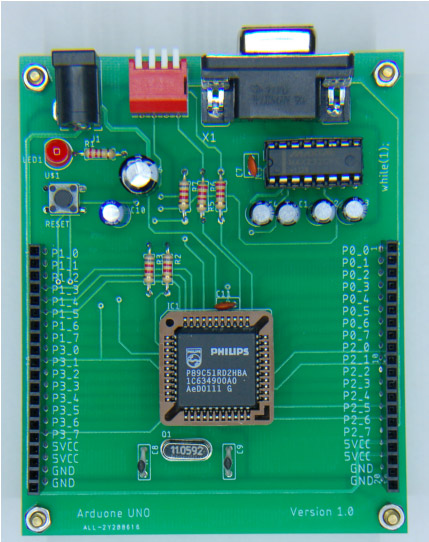
The heart of this 8051 development board is a Philips 8051 family member microcontroller. It is P89C51RD2HBA in a a PLCC package. The PLCC package let you easily replace the chip in case of failure or in case you to use it on other development boards. This particular microcontroller has the following characteristics:
64Kbyte code memory space.
256byte internal ram.
768byte external ram.
4 internal counter.
A serial port used to be programmed or to be used by the internal running program.
5 interrupt sources.
32 I/O pin organized as 4, 8 bit ports
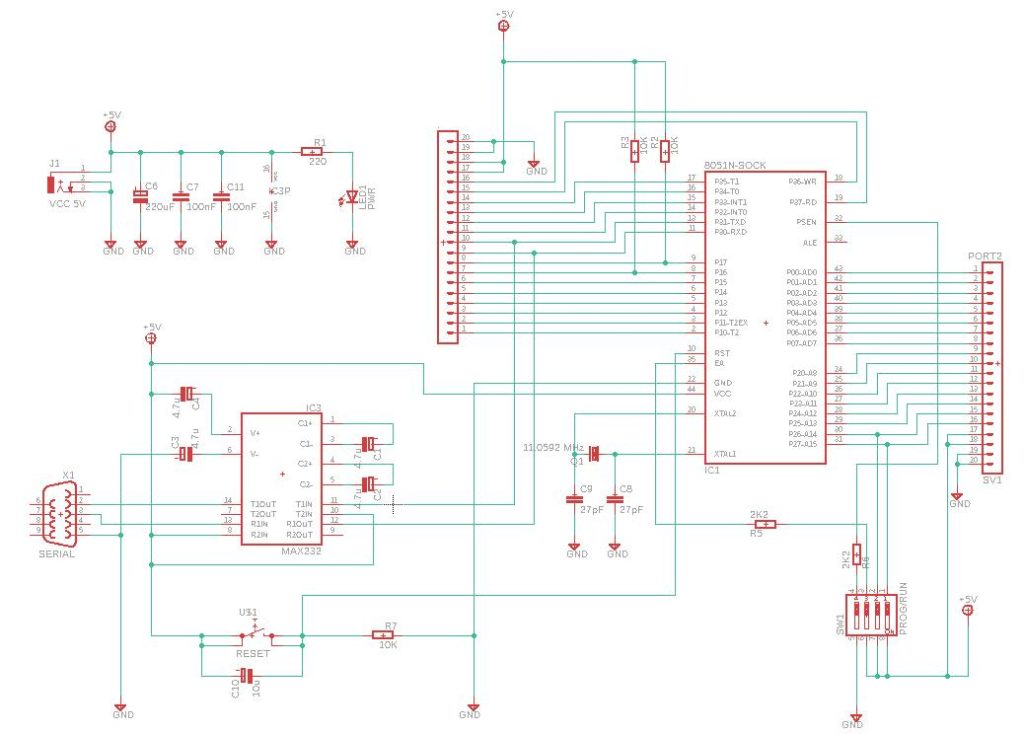
Schematic diagram of Arduone:
PCB design of Arduone:
What is needed besides the card:
To start using the card, you need some additional things. A 5V power supply to power the board or a USB / PowerJack cable to take power from any PC. A serial cable or, in case the PC doesn’t have a serial port an USB / RS232 adapter, and a couple of programs that can be downloaded from the internet. FlashMagic, downloadable from the internet at: www.flashmagictool.com to download the machine language file to the card and a compiler that in our case could be SDCC or uVision5.
A peculiarity of this card is that it has not been designed for a specific IDE. Indeed, on the internet it is possible to download, even for free, Pascal or Basic compilers written for this family of microcontrollers.
My first program in C (for this card we mean of course ..):
Leaving out the installation procedure of the two programs mentioned above, the next step will be to write a first program in C. We will not start with the LED flashing but directly with a small program that writes the words “Hello World!” directly on the terminal connected to the board (TeraTerm, Hyperterminal, etc.). Unlike PC desktop compilers that have a clear understanding of the input and output devices, a microcontroller compiler needs to know what the interface devices will be and how to handle them. So a program that for the home PC looks like this:
It will necessarily need to be turned into a program like this:
#include <8052.h>
#include <stdio.h>
// Initialize serial Comm at 19200 1 stop bit @ 11.0592 MHz
void initSio()
    {
    TMOD &= 0x0F;
    TMOD  |= 0x20;
    TCON  = 0x41;
    TH1   = 0xFD;
    SCON  = 0x50;
    }

// Define necessary function printf at stdio.h
int putchar(int c)
    {
    SBUF = c;
    while (!TI);
    TI = 0;
    }
// Program
void main(void)
    {
    initSio();
    printf("Ciao Mondo !!");
    }
Or even, if you want to avoid using the functions predefined by stdio.h to make the program more compact you will have to write a program like this:
#include <8052.h>
// Initialize serial 19200 1 stop bit @ 11.0592 MHz
void initSio()
    {
    TMOD &= 0x0F;
    TMOD  |= 0x20;
    TCON  = 0x41;
    TH1   = 0xFD;
    SCON  = 0x50;
    }
// Send a character to the serial
void sendChar(char c)
    {
    SBUF = c;
    while (!TI);
    TI = 0;
    }


// Send more characters to the serial
void miaPrintf(char *sz)
    {
    while(*sz) sendChar(*sz++);
    }
// Program
void main(void)
    {
    initSio();
    miaPrintf("Ciao Mondo !!");
    }
Compiling and sending the .ihx or .hex file:
If you have decided to use SDCC as a compiler it will be enough to copy and paste the second program onto a file.c. if instead you have decided to use uVision5 it is better to copy the third program because the implementation of printf exhausts the 2 Kbytes available in the demo version. For this reason I recommend using SDCC even though initially it might seem less easy to use. Once the compilation has been launched, you will obtain a file in intel .ihx or .hex format depending on the compiler. Load this program on flashmagic and send it to the board reminding you to lower the 4 dip switches down and press the reset button to put the card in conditions to receive the file. If all goes well you should find the word “Finished” in the lower right corner of the flashmagic window.
Verification of operation:
With FlashMagic still open click on “Tools”, “Terminal” set the speed to 19200 and the right COM port. A terminal window should open with a black background for output and white for input. Lift the four dip switch switches on the board and press the reset button. If everything went right you should be able to see the words “Hello World !!” repeatedly each time the reset button is pressed.
Hope Arduone will come in handy for the projects you intend to build. Do let me know your feedback or comments about this 8051 development board, looking forward to hear from you guys.