LCD’s are quite familiar module when comes interfacing with microcontrollers. We can find these display modules in plenty of instances where a specific info is need to be displayed for the viewers. This article explains LCD interface with Atmega32 a AVR family Microcontroller and display a message “Welcome Gadgetronicx” text in LCD.
16 x 2 LCD:
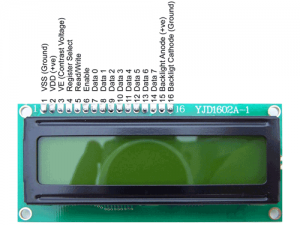
16×2 LCD, got its name since it contains 16 columns and two rows within it thus allowing 32 characters to be displayed in LCD. LCD module usually holds two registers Data and Command registers which is used to define whether the given input is Data or Command. The data lines D0-D7 is used to feed the data byte to the LCD.
The Data byte may be a data or command and its important to convey the LCD that the incoming byte is a Data or Command. This can be done using the RS pin which should be applied a logic 0 in case of command and logic 1 for data. The R/W pins are tend to indicate the Read or write operation where 0 for write and 1 for read. The En enable pin is used to enable LCD to take the input given through D0-D7 pins. This pin should be pulsed high to low with a delay of around 1 ms to make LCD take every byte input.
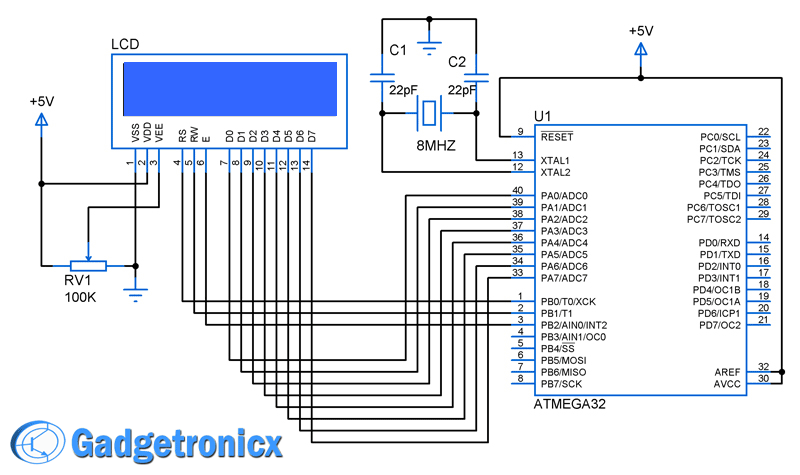
In this design i have interfaced LCD data line(data register) to PORTA. Similarly control lines RS to PORTB.0 , EN to PORTB.2 and R/W pins to PORTB.3 are the other pins used in this design. The AVR was fed with a 8 MHZ crystal which and C1,C2 capacitors was added for stability.


how to use second string