MPR121 based breakout boards will turn (almost) any object to a touch button for your Arduino. The MPR121 IC is a capacitance sensor with 12 input pins, its uses I2C to communicate, has a trigger pin, and can be set to 4 different I2C address, allowing you to add more than one to your Arduino project. And lucky us there are a few good libraries there – for ease of use.
WIRING MPR121 SENSOR WITH ARDUINO:
Most of the MPR121 will have the following pinout:
GND – connect that to your Arduino ground pin
VCC – connect to the Arduino 3.3V (NOTE: 3.3V not 5V !!)
SDA – connect to the I2C SDA pin – in Arduino Uno its A4
SCL – connect to the I2C SCL pin – in Arduino Uno its A5
IRQ – this is the trigger pin, and in our example will connect it to D4 on the arduino Uno
I got to write a few words on the 3.3V tolerance of the mpr121, at its core (without any support circuitry) is a 3.3V chip. But due to the way I2C works (hardware level) it is safe to connect the SDA/SCL directly to the Arduino Uno. But if you experience issues in reading the data you might need to use a logic level shifter.
From my personal experience I never encountered any issues with this breakout boards. And if you buy one from Adafruit from example – the board has extra circuitry to support 5V tolerance.
Now on the other side of the breakout board we have 12 pins that you can connect to anything you like, soda cans, fruits, aluminum foil and many other things. So plug in some jumper wires for now, and lets go get some code going.
In order to communicate with the MPR121 we will need to download a library. There are a few good one out there, me personally, I prefer the one from Bare conductive, here is the link for the library on git.
Download the ZIP file and extract the MPR121 folder out of the ZIP into your “libraries” folder in the Arduino ide working environment. If you done this while your IDE was already – you might have to close it – in order to see the examples in the menu.
Click on “File” -> “Examples” scroll till you see the “MPR121” and choose the “SimpleTouch” example from it.
SAMPLE CODE:
#include <MPR121.h>
#include <Wire.h>

#define numElectrodes 12

void setup()
{
  Serial.begin(115200);
  while(!Serial);  // only needed if you want serial feedback with the
  		   // Arduino Leonardo or Bare Touch Board

  Wire.begin();

  // 0x5C is the MPR121 I2C address on the Bare Touch Board
  if(!MPR121.begin(0x5A)){
    Serial.println("error setting up MPR121");
    switch(MPR121.getError()){
      case NO_ERROR:
        Serial.println("no error");
        break;
      case ADDRESS_UNKNOWN:
        Serial.println("incorrect address");
        break;
      case READBACK_FAIL:
        Serial.println("readback failure");
        break;
      case OVERCURRENT_FLAG:
        Serial.println("overcurrent on REXT pin");
        break;
      case OUT_OF_RANGE:
        Serial.println("electrode out of range");
        break;
      case NOT_INITED:
        Serial.println("not initialised");
        break;
      default:
        Serial.println("unknown error");
        break;
    }
    while(1);
  }

  // pin 4 is the MPR121 interrupt on the Bare Touch Board
  MPR121.setInterruptPin(4);

  // this is the touch threshold - setting it low makes it more like a proximity trigger
  // default value is 40 for touch
  MPR121.setTouchThreshold(40);

  // this is the release threshold - must ALWAYS be smaller than the touch threshold
  // default value is 20 for touch
  MPR121.setReleaseThreshold(20);

  // initial data update
  MPR121.updateTouchData();
}

void loop()
{
  if(MPR121.touchStatusChanged()){
    MPR121.updateTouchData();
    for(int i=0; i<numElectrodes; i++){
      if(MPR121.isNewTouch(i)){
        Serial.print("electrode ");
        Serial.print(i, DEC);
        Serial.println(" was just touched");
      } else if(MPR121.isNewRelease(i)){
        Serial.print("electrode ");
        Serial.print(i, DEC);
        Serial.println(" was just released");
      }
    }
  }
}
This will include the library and the Wire library (needed for the I2C). and define the number of pins used on the board itself – it’s later used for looping.
In the setup
Serial.begin(115200); – This gets the serial communication working, the original baud rate is 9600, I personally prefer working at 115200
Wire.begin(); – This gets the Wire library started – and its needed for the I2C protocol
if(!MPR121.begin(0x5A)) – This initiate the MPR121 library, NOTE I replace the default example I2C address from 0X5C to 0X5A which is the default on most of the breakout boards.
Line 16 to 41 in the code – The above piece of code will execute only if we had issues initiating the MPR121 and it will output the error type and will loop forever (while (1)) – not allowing any other part of the code to run.
MPR121.setInterruptPin(4); – set the IRQ – or trigger pin – to be on D4 of the Arduino.
MPR121.setTouchThreshold(40); – This set the Touch Threshold to 40, valid values are from 0->255
MPR121.setReleaseThreshold(20); – This set the Release Threshold to 20, valid values are from 0->255.
NOTE: this value must be smaller than the touch value.
MPR121.updateTouchData(); – Now we update the data of the sensor to get start values.
Now for the loop its self if(MPR121.touchStatusChanged()) – this value will be true; we know we got new data on the sensor. The value changes according to the IRQ pin – this is why we need it.
MPR121.updateTouchData(); – We again update the data from the sensor, to get the current state of each of the input pins.
for(int i=0; i<numElectrodes; i++) – we loop over the number of electrodes we defined in the beginning.
if(MPR121.isNewTouch(i)){ Serial.print(“electrode “); Serial.print(i, DEC); Serial.println(” was just touched”);
We check if there is a new touch on each of the pins. If so we show the output
else if(MPR121.isNewRelease(i)){ Serial.print(“electrode “); Serial.print(i, DEC); Serial.println(” was just released”); }
And we also check if there were any new release. After you upload the code and open the serial monitor, any touch or release of the jumper wires will trigger an output of what was touched or released.
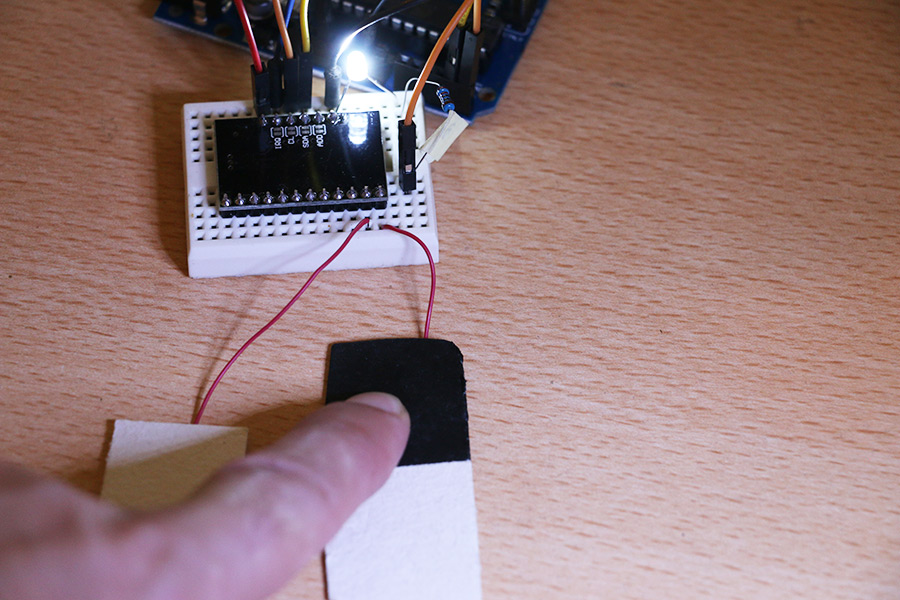
After we got to know how things work, Now let’s make something useful. I removed all the comments from the code, added a led on pin 3, and added 2 more IF :
I connected a touch pad made out of cardboard painted with Conductive Paint, from bare conductive https://www.bareconductive.com/ . The first “button” will switch the LED on once it touched. And the second “button” will turn it off – once released. Upload the code and we got a 2 button switching mechanism.
CODE TO TURN ON AND OFF LED’s:
#include <MPR121.h>
#include <Wire.h>

#define numElectrodes 2

#define LEDPIN 3

void setup()
{
  Serial.begin(115200);
  Serial.println("System started");
  pinMode(LEDPIN, OUTPUT);

  Wire.begin();

  // 0x5C is the MPR121 I2C address on the Bare Touch Board
  if (!MPR121.begin(0x5A)) {
    Serial.println("error setting up MPR121");
    switch (MPR121.getError()) {
      case NO_ERROR:
        Serial.println("no error");
        break;
      case ADDRESS_UNKNOWN:
        Serial.println("incorrect address");
        break;
      case READBACK_FAIL:
        Serial.println("readback failure");
        break;
      case OVERCURRENT_FLAG:
        Serial.println("overcurrent on REXT pin");
        break;
      case OUT_OF_RANGE:
        Serial.println("electrode out of range");
        break;
      case NOT_INITED:
        Serial.println("not initialised");
        break;
      default:
        Serial.println("unknown error");
        break;
    }
    while (1);
  }


  MPR121.setInterruptPin(4);
  MPR121.setTouchThreshold(40);
  MPR121.setReleaseThreshold(20);
  MPR121.updateTouchData();
}

void loop()
{
  if (MPR121.touchStatusChanged()) {
    MPR121.updateTouchData();
    for (int i = 0; i < numElectrodes; i++) {
      if (MPR121.isNewTouch(i)) {
        if (i == 0) {
          digitalWrite(LEDPIN, HIGH);
        }

      } else if (MPR121.isNewRelease(i)) {
        if (i == 1) {
          digitalWrite(LEDPIN, LOW);
        }
      }
    }
  }
}
The library has many other very cool features, which I’m not going to cover in full, I can suggest you look at the H file and see what are the options, here is a link to it
DEMO VIDEO:
Few last words on how to change the I2C address of the MPR121. What sets the address is where the ADR(ress) pin is connected to. In most of the common breakout board you will find on the internet, the address pin is connected to the ground via a pad on the back, cutting the pad with a knife in the middle will change its Address to 0x5B for example. You can then connect the address pin to other pin out like the SCL and SDA.
So what you are going to make with this cool touch sensor? Leave your thoughts, feedback and questions below 🙂